
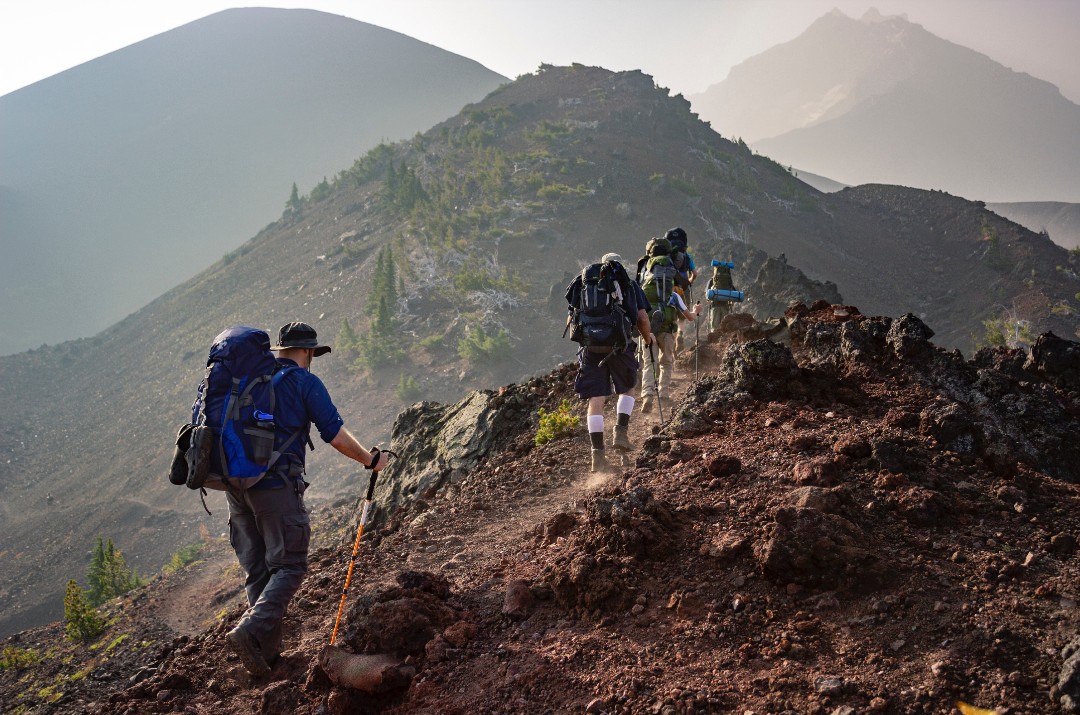
You’ve been practically locked indoors for nearly two seasons and your feet are getting itchy. So, what do you do? You toss your old, dusty camping gear into your camper van (hopefully with your trusty first-aid kit) and make a beeline to a remote nature reserve far beyond civilization with Fido and your bestie—say Death Valley, for instance.
The roads are incredibly narrow, full of twists and turns, and very rocky; but the 360-degree view of rolling mountains and winding rivers is worth that “I’m going to die” feeling you get in the pit of your stomach as you squeeze your van around the canyon at 5 mph until you reach an old mining town long-since gone.
Intrigued by the history and ineffable beauty, you pull over so you can all explore the remains of rusted cans and antique cars. Just as your friend steps into an old car skeleton, Fido sprints after a jackrabbit. Afraid he’ll get lost, your friend bursts out of the car in an attempt to grab him and twists her ankle in the process, landing elbow-first on the hard ground. She screams out in pain as she remains laying on the ground.
Now what?
This is where wilderness first aid will come to your rescue. You don’t have to be officially trained as a Wilderness First Responder to equip yourself for backcountry excursions. But tips from this training could help keep you and your friends safe and stable as you a wait for trained professionals in the event of an emergency.
Data from U.S. National Parks indicate that the most common injuries treated by wilderness medicine specialists are soft-tissue lesions [damage of muscles, ligaments and tendons throughout the body], sprains, strains, and lower-extremity fractures.
Therefore, we will focus on muscle injuries.
In this article, you’ll learn how to assess the injury, how to temporarily treat the injury, and best preventive measures that’ll help you make the most of your backcountry excursions.
How to Assess an Injury in the Backcountry
We’re sure that many of you seen the emergency videos in grade school and learned the acronym DR ABC (Danger, Response, Airway, Breathing, Circulation).These tips below take that one step further in order to account for your unique situation, when help could take hours to days to arrive.
Now, your case may not seem dire at first, but surprises do happen. So even if you think the injury is minor, it is best practice to follow the full patient assessment system (PAS) in the case of a major fall.
[Note: Only assess and treat an injury according to your scope of knowledge and training].Basic Assessment of a Muscle and Joint Injury
Presuming that you have evaluated that scene is safe for you to approach, you should inspect the injury. You’ll want to keep the patient calm and stable as you inspect the injuries. In brief, you need to “LAF.” No, not that kind of laugh, although laughter could be good medicine. But we mean that you need to look, ask, and feel.
LAF steps include:
- Look: Look for blood and discoloration.
- Ask (listen): Ask if anywhere hurts or feels like it’s bleeding. Ask if there are popping or snapping sounds, which could indicate an injury. Ask the patient how bad the pain is on a scale of 1-10.
- Feel: Feel around the body gently, especially where there is pain (with permission of course). This is a good time to perform a usability test. Ask the patient to try to stand to evaluate if he/she can apply pressure on the foot. You’ll want to offer your body as support just in case the patient cannot stand. In the case of an arm injury as demonstrated in the introduction, you’ll also want to conduct a usability test on that as well by asking the patient to try to bend the elbow or grasp something.
According to Buck Tilton, author of NOLS’ Wilderness First Responder, “The single most important factor related to a wilderness athletic injury is the patient’s ability to use the injured part.”
After all, you’ll ultimately want to finish the hike or be able to leave without being carried out.
<<Ease Your Muscle and Joint Pain and Get Back in Action>>

Basic Treatment of Muscle and Joint Injuries in the Backcountry
You might be relieved to know that the National Institute of Health has noted that “more than 70% of nonfatal events [in the wilderness] were related to musculoskeletal or soft tissue injury,” mostly the lower limbs (I.e., the legs and feet).
For this reason, we’ll focus on what you can do to treat common strains, sprains, and minor swelling when you’re out in the great outdoors.
To begin managing the injury, you’ll want to remember one more important acronym, HI-RICE (hydration, ibuprofen, rest, ice, compression, and elevation). Now, we know that some of you may not want to take oral medications due to concerns about side-effects or a commitment to natural health, so we’ll give you alternative options below. But there will be times that you’ll be thankful you had it on-hand.
In short, you need to attempt to help decrease swelling as much as possible and to limit the pain so the patient can get back on his/her feet, literally.
Note: It is important to receive medical attention by a trained professional once you return from your trip. In the event of a serious injury, you should evacuate the patient and get him or her to a hospital.
Here are the basics of HI-RICE
- Hydrate: We’re sure that you’ve heard that water is the source of life and that your body is mostly comprised of water. But did you know that adequate hydration can help speed the recovery time of an injury? The patient is also going to need to wash that ibuprofen down with something if he/she opts for it.
- Ibuprofen: If the patient is in significant discomfort, he or she will probably want a nonsteroidal anti-inflammatory drug (NSAID) to handle the pain and reduce inflammation, barring that the patient doesn’t have any pre-existing conditions that prevent him or her from taking it. These drugs do carry some side-effects like stomach upset, so be sure to offer food as directed with the medication. (Those of you plant nerds can take advantage of salicin in the willow bark, a similar chemical found in aspirin if worse comes to worst. Just wash the bark before anyone chews it. And never, ever eat a plant you are not 100% familiar with (Into the Wild ring a bell?). That aside, if the patient is not in serious pain and doesn’t have broken skin around the injured area, consider a topical pain reliever to soothe the muscle or joint injury like CBDMEDIC™’s Active Sport Pain Relief Stick. Once you feel the cooling relief of the naturally derived active ingredients, it’ll quickly become your “must-have” in your camping first aid kit. You’ll be happy to know that naturally derived topicals have minimal impact on the environment (as long as you uphold the 7 principles of “Leave No Trace” ethics for the outdoors).
- Rest: The body needs rest to heal, plain and simple. Moreover, if the patient does not move, he/she can reduce circulation in the area, which can reduce swelling. Resting can also prevent further injuries from occurring.
- Ice: You may or may not have packed ice in a cooler, but that doesn’t mean you can’t improvise with the gifts from nature. Is there a cold stream nearby? Perhaps there is snow leftover in the shade. Maybe you have a chemical ice pack in your first aid kit. You need to introduce something cold for approximately 20-30 minutes to constrict the blood vessels in order to deter swelling. Just remember to put a layer of cloth between ice, snow, and cold packs to the body. You DO NOT want to apply heat at this stage since it can actually enhance the swelling.
- Compress: Wrap the area with an elastic wrap if you have one or improvise with a stretchy cloth if you must in order to discourage swelling. We’ll cover this part in more detail later. For now, just remember that you need to secure the area, but don’t wrap it so tight that you cut off circulation, sensation, or motion or you’ll have an entirely new problem on your hands. Make sure you check the area often just to ensure that you did not wrap the area too tightly. If you can squeeze a finger inside, you are probably ok. But ask how it feels too.
- Elevate: Finally, you need to elevate the injured part of the body slightly higher (and comfortably) than the person’s heart in order to prevent or decrease swelling. For the case of the injured elbow and ankle, the patient should lay on a ground pad and rest her arm and leg on a backpack, a large rock with soft clothing underneath for padding, or whatever else you have that you can use to elevate the injured limbs.
Bottom line: The HI-RICE method can help reduce swelling.
Treating Common Muscle and Joint Injuries in the Backcountry

If you’ve been out for a hike or a jog or play sports, you’ve likely experienced the all-to-common strain, sprain, dislocation, or tendonitis. Before we get to treating them, let’s differentiate these common outdoor injuries.
Strain: An injury to the muscles and tendons as a result of stretching or pulling it too far, sometimes leading a tear. You will probably see bruising, but little to no swelling.
Sprain: Similar to a strain, this injury to the ligament is a result of overstretching. There could be bruising, tearing, and swelling at the 2nd and 3rd degree.
Tendonitis: Anything with the -itis suffix generally refers to inflammation. In this case, we are referring to an overworked tendon that results in swelling. This is rarely a result of trauma like falling, but simply from overextending yourself beyond your limits or not warming up and stretching properly first.
Dislocation: An injury involving the movement of a bone away from its normal position at a joint.
Low back strain
Low back strain is another common side-effect of putting stress on your back in the wilderness. If you’re small in stature and carry the same weight in your pack as your larger peers to keep up, you probably know exactly what we mean. But it can happen just as easily to anyone, particularly the non-athletic types who try to push their limits.
To treat a low back strain, you’ll want to try the HI-RICE method first. And if you have a pain relief topical, that’ll certainly take the edge off. Additionally, gentle core strengthening exercises like abdominal crunches can help. The patient can also tuck his or her knees to his or her chest and roll back and forth on his or her back in a rocking motion to ease the pain. Massages a few times a day with the fists can do wonders for the pain, too.
Ankle sprain or strain
Mild (1st degree) to moderate (2nd degree) ankle sprains or strains can be taped with athletic tape or kinesiology tape in order to stabilize the ankle while also permitting some movement. This also prevents further injury. If the injury is more serious, you’ll want to splint the injury and evacuate the patient. However, to maintain focus, we’ll only focus on minor injuries.
How to tape the ankle
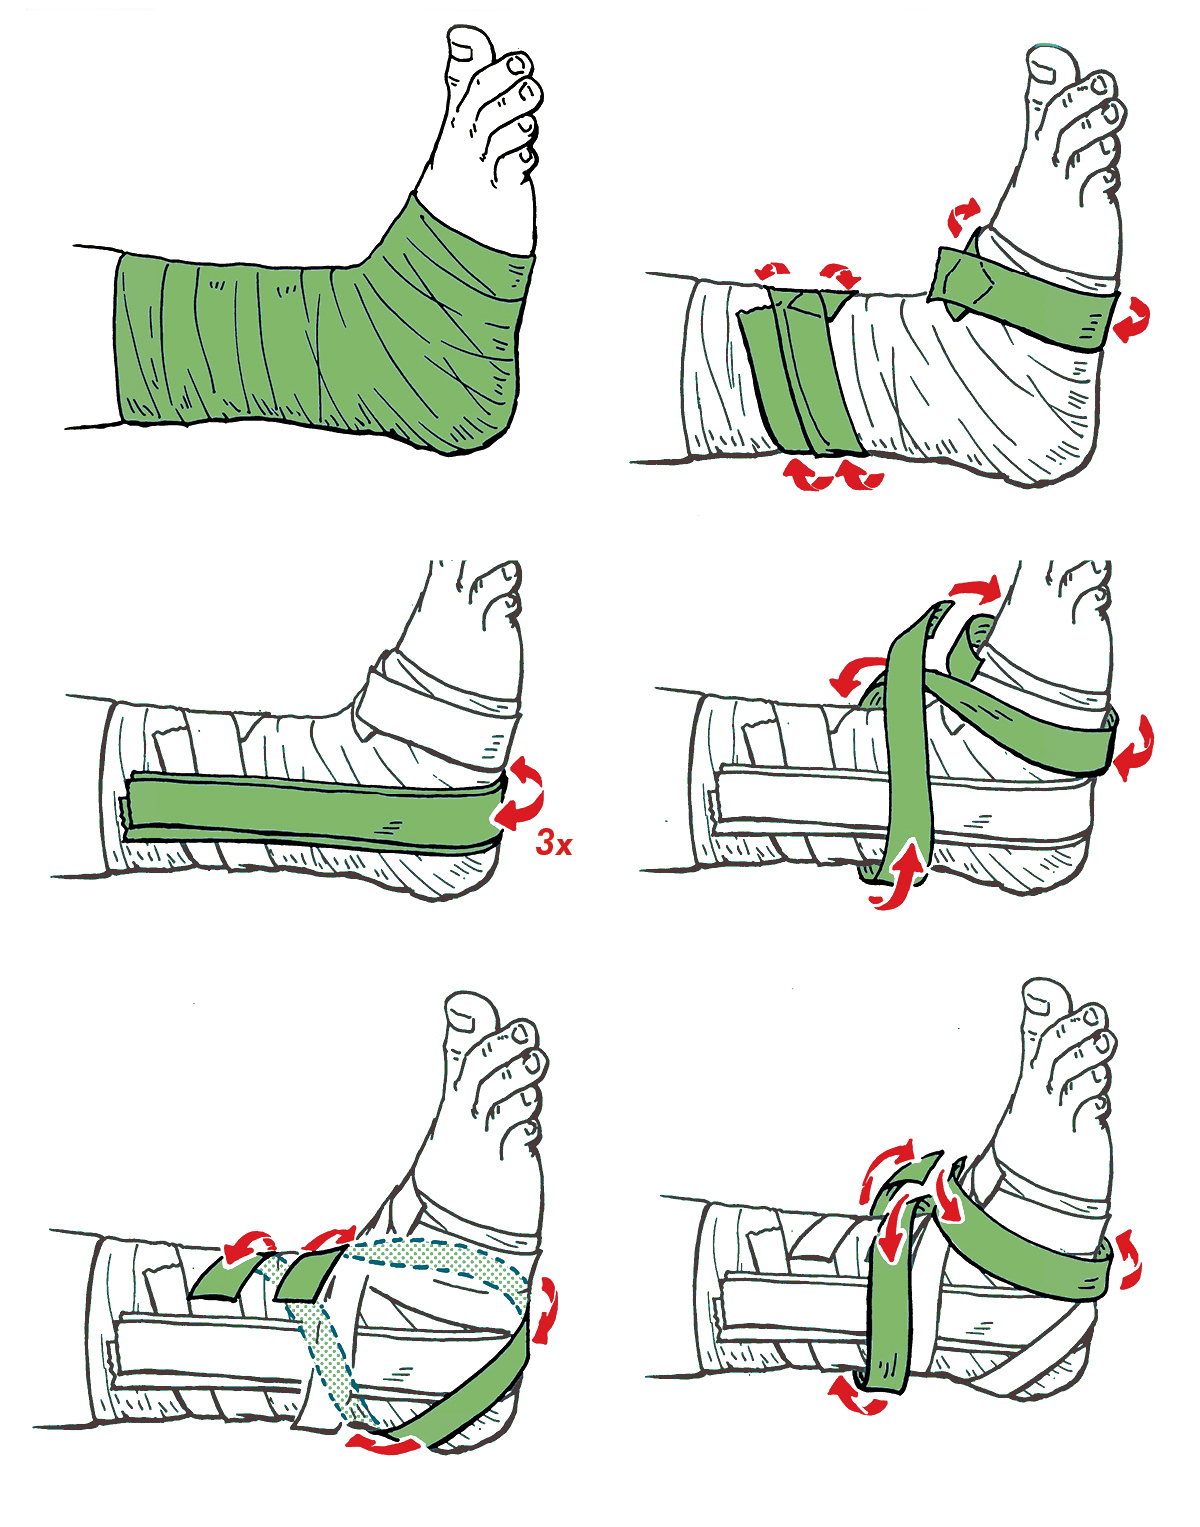
- Take the medical tape or kinesiology out of your first-aid kit if you have it. If not, you can always improvise by tearing or cutting a t-shirt into strips. Remember, tape works best if applied to direct skin. If there is hair and you can remove it, do it.
- Ask the patient to flex his/her foot. It should be at a 90-degree angle.
- Make a boundary with the tape just a few inches above the ankle and close to mid-foot.
- Tape stirrups in order to secure the foot at 90-degrees.
- Apply a J-shape, starting on the uninjured side of the foot.
- Start with tape at the bottom of the foot and create a few figure-8’s to stabilize the ankle further.
- Close with a heel-lock, a strip of tape that goes from the bottom of the foot and behind the ankle to the top of the foot.
Achille’s tendon injury
The Achille’s tendon, that small area right behind your ankle, can be overworked from strenuous hikes. To relieve the stress, simply apply a quarter-inch of padding under the heel. For further support, also tape padding to both sides of the Achille’s tendon.
Knee injury
A knee injury can make it rather difficult to continue a hiking journey, especially on rocky terrain. Again, this is quite common in hikers who carry excessive weight in their packs for hours to days on end. In order to prevent further injury, you’ll need to stabilize it with a good old-fashioned knee brace with the circle cut out in the knee-cap area or make a walking knee brace with whatever you have available, like the “t-shirt first aid” method. (Ps. Pro-tip. You’ll put less pressure on your precious knees if you walk sideways downhills and you’ll be more stable on rocky terrain).
How to wrap a walking knee brace
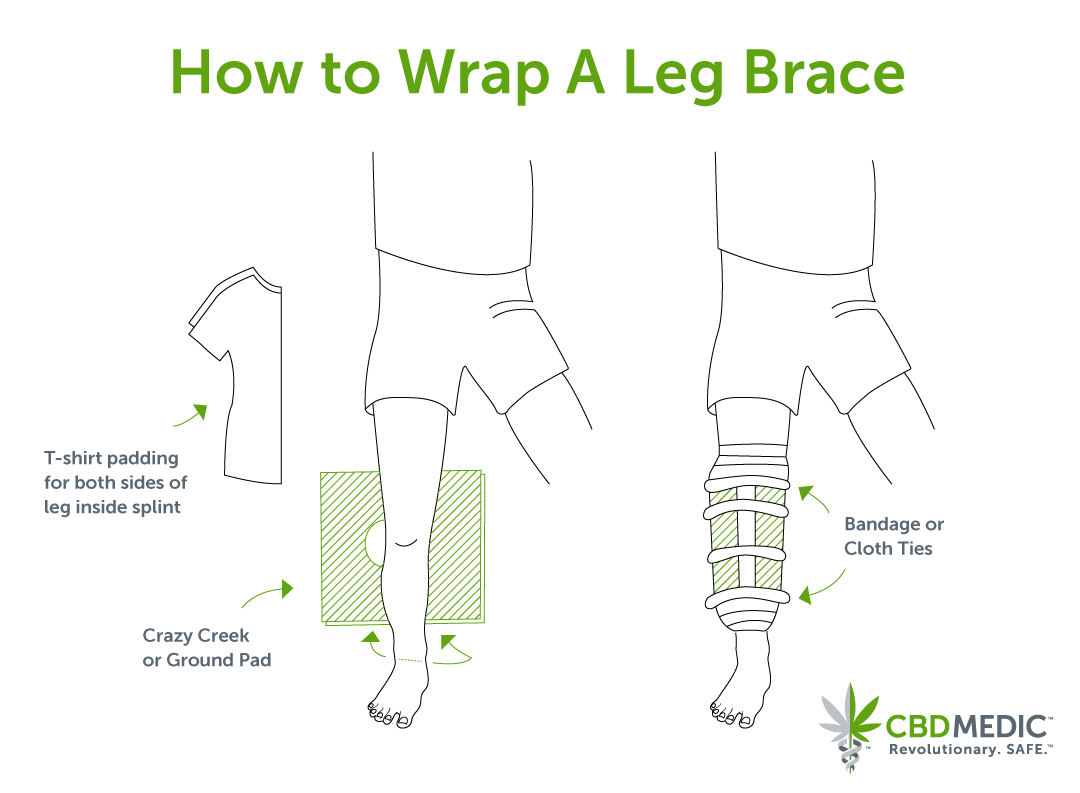
- Roll a small amount of cloth and place it behind the knee to help it stay bent at a 10-degree angle in order to allow a small bend. You can fold the extra material on either side of the knee for extra support.
- If you have a foam camping pad, cut it so it fits around the knee. Or, if you don’t want to cut your precious ground pad (if the injury isn’t too serious of course), you can always fold the ground pad to make it work. You’ll have some trial and error here.
- Ask the patient to lift his/her leg up and slide the padding under the knee. Then wrap the padding around the knee.
- Fold the ground pad around the knee and tie it with cloth strips or tape it. Tie two strips of cloth above the knee and two below the knee, not directly on the knee.
If you must continue the hike, you’ll likely need a nice, sturdy stick as well for support.
Shin splint
If you are runner, you probably know this one all-too-well. In lay terms, this is when the front part of the leg muscles below the knee crash into the surrounding connective tissue. And it hurts, especially when the feet hit the ground. For most cases, you can use the HI-RICE method and/or use a sport’s cream, spray, stick, or ointment to ease the pain.
Elbow injury
Aside from falling, like our friend in the introduction, the elbow is commonly a result of overuse. This is a type of injury well-known to tennis players, but it could happen from your fire building activities, too. If you’re a “primitive skills” enthusiast with the patience for bow drill stick fires, you can over-extend your elbow muscles just as easily.
To remediate the pain, you’ll certainly want to take it easy with the HI-RICE method and/or a topical pain reliever. You can also wrap a cloth band about 1-inch below the patient’s elbow to create slight pressure during activities. A make-shift brace can also be made for the elbow similar to the knee brace.
Shoulder injury
As much as you think you can carry the weight of the world on your shoulders, it’s not actually designed to carry more than your 8-pound head. Likewise, your shoulders can become burdened with too much over the shoulder exercises like rowing.
To get through the pain, the patient will benefit from the HI-RICE method. And if the pain is felt more in the muscles, be sure to apply a good pain relief topical.
Preventing Athletic Injuries in the Backcountry
Now that that’s all said and done, how do you actually prevent yourself from getting to the point of needing treatment?
Follow these tips for injury prevention in order so you can protect yourself and your peers outdoors.
- Make wise choices. Don’t try to push yourself beyond your capacity or behave recklessly. Nature is not forgiving.
- Stay in shape. Healthy, strong muscles can support your body better and withstand more burden or use.
- Eat a healthy diet (including water). We’re sure that you’ve heard that food is your medicine. A well-balanced diet full of fresh vegetables and adequate hydration will help keep you strong, well-fueled, and full of energy. You can spice your food with ginger and turmeric or take a supplement with these ingredients, like Charlotte Web’s CBD Gummies: Recovery. These help support joint health and strength and a healthy recovery from exercise-induced inflammation.
- Get adequate sleep. Your body needs sleep to repair from daily stressors. Likewise, if you are not well-rested, your focus can whisk you away. When it comes to the outdoors, you need to be on top of your game. Save the long nights for the comfort of your own home, in moderation of course.
- Maintain a healthy weight. Like we said earlier, the body is not meant to endure heavyweight. And that includes your own. Likewise, if you are too thin, your body will have challenges upholding the extra burdens of the outdoors.
- Be prepared. This means warm-up with light stretches, pack the right food and gear for the environment, and wear weather-appropriate clothing.
- Take a wilderness basics course. If you plan to deviate off the beaten path, we highly recommend that you familiarize with hiking and camping guidelines, including safety procedures and a Wilderness First Aid course. The Red Cross, NOLS, and the Sierra Club are great places to start. Or take a guided trip with at least one expert.
Key Takeaway
Be prepared to handle an injury before you head deep into the unknown with simple wilderness first aid tips. If injury does strike, assess the situation and treat according to your ability. In most circumstances, you will likely need to treat a muscle and joint injury with HI-RICE (hydration, ibuprofen, rest, ice, compression, and elevation) and maybe a simple brace. So, whether it’s a day trip or a few days to a week out in the wild, don’t forget the first aid kit. We highly recommend a naturally derived pain relief topical to throw in the mix.
Primary Resources:
American Red Cross. Wilderness and Remote First Aid: Emergency Reference Guide. United States. Krames Staywell Strategic Partnerships Division. 2014.
Montalvo R, Wingard DL, Bracker M, Davidson TM. Morbidity and mortality in the wilderness. West J Med. 1998;168(4):248-254.
Sward DG, Bennett BL. Wilderness medicine. World J Emerg Med. 2014;5(1):5-15. doi:10.5847/wjem.j.issn.1920-8642.2014.01.001
Tilton B. Wilderness first responder. 2nd Ed. Guildford, CT & Helenford, MT. The Globe Pequot Press. 2004.
CBDMEDIC is proud to announce that we’re part of the Charlotte’s Web™ family. Shop all Charlotte’s Web products including CBD Oils, CBD Isolate, CBD Capsules, CBD Gummies for Sleep, Calm, and Exercise Recovery, CBD Balms and Creams, CBD Oils for dogs, plus Charlotte’s Web accessories like our popular Trust the Earth Hat.
This information is for educational purposes only and is not intended to replace medical diagnosis or treatment. Seek medical assistance for any injuries. These statements have not been evaluated by the FDA and products mentioned are not intended to diagnose, treat, cure, or prevent any disease.